Understanding domain statuses: Verified, Processing, Unverified
Managing sending domains
Why DNS records matter for email deliverability
Adding & verifying DNS records (SPF, DKIM, DMARC)
Checking & resolving domain blacklist issues
Managing sender email addresses
Sender address requirements and best practices
What to do if a sender address is in use by active campaigns
Understanding shared vs. dedicated IP addresses
Connecting or disconnecting a domain to/from an IP address
Buying & managing dedicated IP addresses
User roles & statuses
User status explained: active and deleted users
How to add a new user: user invitations and registration
Managing user permissions and access rights
Default permissions for additional users
Deleting users
Transferring admin rights to another user
What happens after admin rights are transferred?
What happens when permissions are disabled for a user?
How to create your first email campaign
Campaign card overview: General, Contacts, Email template, Scheduler
Naming and renaming campaigns
Understanding campaign statuses: Waiting, In progress, Paused, Finished
Saving progress and navigating between campaign blocks
How to set up the sender email address and name
Managing reply-to addresses in campaigns
Selecting and managing IP addresses for sending
How to select recipients: Contacts, Groups, Segments
Excluding contacts and groups from a campaign
Understanding contact limits and subscription packages
What to do if you exceed your email sending limit
Validating contacts before sending: Email Checker explained
Choosing and editing email templates for campaigns
Uploading custom HTML
Writing effective subjects and preheaders
Adding and managing UTM parameters
Scheduling campaigns: send now or later
Setting up delivery dates, times, and days of the week
How to calculate and adjust sending volume over time
Managing dedicated IP expiration and renewal
How to preview and test your campaign
Managing and editing your test email group
Using the campaign calendar: viewing, filtering, and creating campaigns
Understanding campaign statuses: Active, Scheduled, Completed
Viewing campaign details and quick actions from the calendar
Navigating the campaign list: columns and filters
Searching and filtering campaigns by name, date, and status
Campaign card: overview, timeline, and audience
How to pause, continue, or delete a campaign
Understanding campaign statuses: Planned, Active, Paused, Finished
Campaign performance & analytics
Using heatmaps to analyze email engagement
Automations
Creating a New Automation
Understanding Automation Templates
Managing Your Automations List
Automation Builder: Overview and Navigation
Setting Up Automation Details (Name, Description, Tags)
Working with Triggers
Working with Actions
Managing Elements in the Workflow Canvas
Running and Pausing Automations
Automation Settings Panel
Managing Emails and Templates Inside Automations
Contact Management Inside Automations
Creating & managing segments
Segments in Sendigram allow you to target specific groups of contacts within your groups based on conditions like activity, demographics, or subscription details. Proper segmentation leads to higher engagement, lower unsubscribe rates, and better deliverability.
1. What is a Segment?
A segment is a dynamic subset of a group created using rules or filters. Unlike separate groups, segments update automatically as contacts meet or no longer meet the set conditions.
- Example segments:
- Contacts who opened an email in the last 30 days.
- Subscribers from a specific country.
- Customers tagged with "VIP."
2. Creating a Segment
- Go to Contacts → Segments.
- Click Create a Segment.
- Enter a name for your new segment.
- Define conditions, such as:
- Contact data: location, signup source, tags, custom fields.
- Engagement activity: opened/clicked/not engaged in X days.
- Status: active, unsubscribed, bounced.
- Click Save segment.
- The system will display matching contacts immediately.
3. Managing Segments
All of your saved segments will be listed in the "Segments" tab.
To Edit a Segment:
- Open the segment you want to edit.
- Above the list of the segment's contacts you will see the Conditions bar. There you can add,
modify, or remove any of the conditions.
- To access more editing functions click on the Actions button. Now you can:
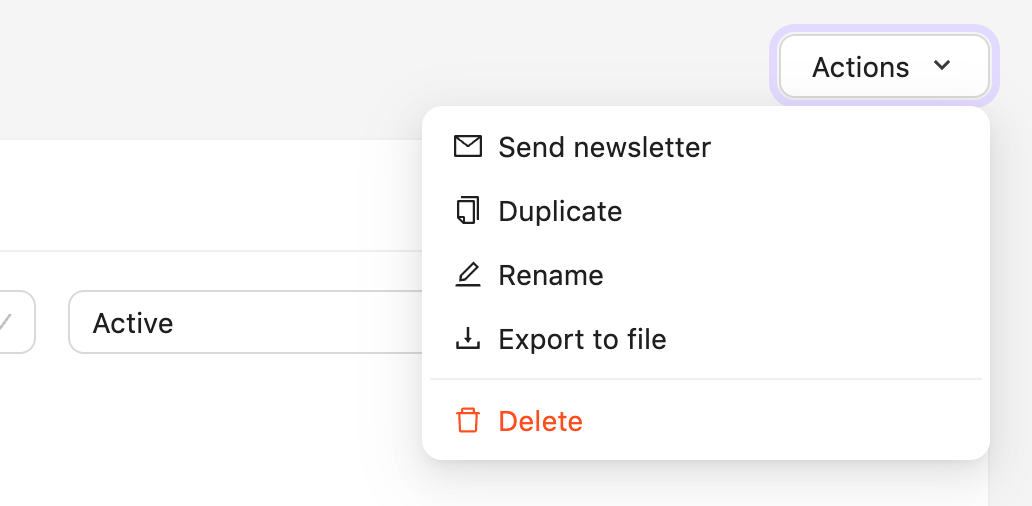
- Send the newsletter to the contacts in this segment.
- Duplicate the segment.
- Rename the segment.
- Export the contacts from the segment to a file.
- Once you are finished with your changes, click "Save". The segment will automatically update its contact list based on the new rules.
To Delete a Segment:
- Open the segment you want to delete.
- Click on the Actions button.
- Select "Delete" from the options.
- A confirmation pop-up will appear. Confirm your choice to permanently delete the segment.
Important: Deleting a segment does not delete the contacts within that segment. It only removes the saved set of rules and the dynamic group it created. Your contacts will remain safe in your main contact database.
4. Using Segments in Campaigns
- When creating a campaign, you can select a segment as the recipient group.
- This allows highly targeted messaging, such as:
- Sending discounts to inactive users.
- Promoting upgrades only to paying customers.
- Sending localized campaigns to specific countries or languages.
5. Best Practices for Segmentation
- Start simple (active vs. inactive) before building complex conditions.
- Use tags and custom fields to create richer segments (e.g., purchase history, interests).
- Regularly review segment performance — if a segment doesn't engage, adjust the rules.
- Don't over-segment — too many small segments can reduce campaign efficiency.
Still have questions?